Growing plants on your balcony can transform a mundane space into an oasis of greenery. Among the many options available, Malabar spinach (Basella alba) stands out as a unique and nutritious choice. This tropical vine not only thrives in pots and planters but also adds vibrant foliage and delicious leaves to your culinary repertoire. This article will guide you through the steps to successfully grow Malabar spinach on your balcony, ensuring that you have a lush, green space to enjoy.
What is Malabar Spinach?
Malabar spinach, often referred to as “Basella” or “Ceylon spinach,” is a fast-growing, perennial vine native to tropical Asia and Africa. Unlike traditional spinach, which is a cool-season crop, Malabar spinach loves warm weather and does particularly well in temperatures ranging from 70°F to 90°F (21°C to 32°C). The leaves are thick, fleshy, and have a slightly mucilaginous texture, making them ideal for stews, soups, and salads.
Benefits of Growing Malabar Spinach
- Nutritional Value: Malabar spinach is rich in vitamins A and C, iron, calcium, and antioxidants.
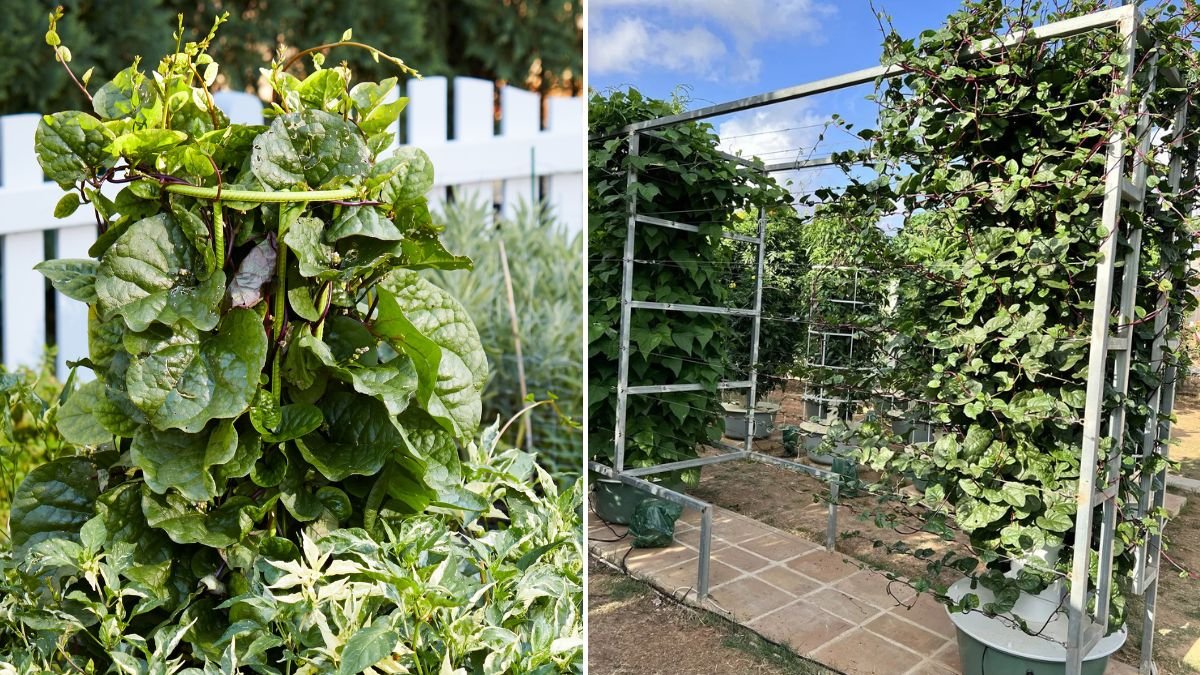
- Space Efficiency: This vine requires vertical space, making it perfect for balconies with limited ground area.
- Aesthetics: The vibrant green leaves and delicate flowers add aesthetic appeal to any space.
- Culinary Versatility: The leaves can be eaten raw or cooked, making it a great addition to various dishes.
Step-by-Step Guide to Growing Malabar Spinach on Your Balcony
1. Choose the Right Container
Selecting the right container is crucial for successful growth. Opt for a pot that is at least 12 inches deep and 12 inches wide to provide ample space for the roots to develop. Ensure that the container has drainage holes to prevent waterlogging.
2. Prepare the Soil
Malabar spinach thrives in well-draining, nutrient-rich soil. A high-quality potting mix combined with compost will work wonders. You can create your own mix using:
- 50% potting soil
- 30% compost
- 20% perlite or vermiculite
This combination ensures good drainage and provides essential nutrients for the growing plant.
3. Planting the Seeds or Seedlings
You can grow Malabar spinach from seeds or transplants. If starting from seeds, soak them in water for 24 hours before planting to enhance germination.
-
When to Plant: Malabar spinach prefers warm temperatures. Plant seeds or seedlings in late spring or early summer when temperatures consistently remain above 70°F.
-
How to Plant:
- Fill your container with the prepared soil mix.
- Make small holes about 1 inch deep and place 2-3 seeds or one seedling in each hole.
- Cover lightly with soil and water gently.
4. Provide Support for Growth
Malabar spinach is a climbing vine that needs support to grow vertically. You can use:
- Trellis
- Stakes
- Walls or fences
Position the support near the plant at the time of planting so that the vines can easily cling to it as they grow.
5. Watering and Fertilization
-
Watering: Malabar spinach likes consistently moist soil but not waterlogged conditions. Water the plant thoroughly whenever the top inch of soil feels dry to the touch. During extreme heat, daily watering may be necessary.
-
Fertilization: Use a balanced liquid fertilizer every 4-6 weeks to promote healthy growth. Avoid over-fertilizing, as this can lead to excessive leaf growth without flavor.
6. Pest and Disease Management
Malabar spinach is relatively pest-resistant, but you should still keep an eye out for common garden pests like aphids and spider mites.
-
Organic Solutions: If you notice pests, wash them off with a strong stream of water or use insecticidal soap to keep them at bay.
-
Diseases: Mildew can be an issue in overly humid conditions. Ensure good air circulation around the plant by not overcrowding.
7. Harvesting
You can start harvesting leaves about 6-8 weeks after planting. Young, tender leaves are the tastiest.
- How to Harvest: Use a pair of clean scissors or garden shears to cut leaves and stems without damaging the entire plant. Regular harvesting will encourage more growth.
8. Seasonal Considerations
Malabar spinach is a warm-weather plant, so be prepared to transition it indoors if you live in an area with cold winters. If growing in a pot, simply bring the container inside when temperatures drop below 50°F (10°C).
9. Propagation
Malabar spinach can easily be propagated by cuttings. Select healthy, mature stems and cut them just below a node. Place the cuttings in water and keep them in a bright spot until roots emerge. Once you see roots, transplant them into soil.
Maintenance Tips
- Pruning: Regularly prune to remove any dead or yellowing leaves to promote airflow and health.
- Mulching: Adding a layer of organic mulch can help retain moisture and control weeds.
- Rotation: If you grow other plants, consider rotating crops to prevent nutrient depletion in the soil.
FAQs
1. Can Malabar spinach grow in partial shade?
Yes, while it prefers full sun, Malabar spinach can also tolerate partial shade. However, it may not grow as vigorously.
2. How often should I water Malabar spinach?
Water it whenever the top inch of soil is dry. In hot weather, this may mean daily watering.
3. Is Malabar spinach a perennial or annual plant?
Malabar spinach is a perennial in tropical climates but is commonly grown as an annual in temperate regions.
4. How do I know when to harvest Malabar spinach?
You can start harvesting the leaves when they are young and tender, typically around 6-8 weeks after planting. Regular harvesting encourages more leaf growth.
5. Can I grow Malabar spinach indoors?
Yes, you can grow Malabar spinach indoors as long as it receives adequate sunlight. A sunny windowsill is ideal.
6. Are there any pests that target Malabar spinach?
Common pests include aphids and spider mites, but Malabar spinach is generally pest-resistant.
7. How can I use Malabar spinach in my cooking?
Malabar spinach can be used in salads, soups, stews, and stir-fries. Its texture makes it an excellent thickening agent for soups.
8. What should I do if my Malabar spinach is wilting?
Check the soil moisture. Wilting can indicate either underwatering or overwatering. Adjust your watering habits accordingly.
Conclusion
Growing Malabar spinach on your balcony is an enjoyable and rewarding endeavor that not only elevates your living space aesthetically but also provides you with a fresh and nutritious addition to your meals. With the right container, soil, and care, you can cultivate this delicious vine throughout the warm months and enjoy its delightful greens all summer long. Following the steps and tips provided in this guide will ensure that your balcony becomes a lush green sanctuary filled with the unique charm of Malabar spinach. Happy gardening!