How to Successfully Grow Rosemary in Water from Cuttings for Thriving Indoor Herb Gardens
Growing herbs indoors can be a rewarding and fruitful endeavor, especially when it comes to rosemary (Rosmarinus officinalis). With its fragrant leaves and culinary versatility, rosemary is a favorite among home cooks. While traditional gardening methods require soil and outdoor space, you can successfully propagate this aromatic herb in water from cuttings. This not only allows you to produce new plants but also enhances your indoor environment with their delightful scent. In this article, we’ll discuss the step-by-step process of growing rosemary from cuttings in water, the ideal conditions for thriving indoor herb gardens, and answer common FAQs.
Understanding Rosemary
Before diving into propagation techniques, it’s important to understand rosemary’s unique characteristics. This perennial herb is native to the Mediterranean region, where it thrives in sunny, dry climates. Rosemary is known for its needle-like leaves and woody stems, which can become quite large. When growing indoors, rosemary generally requires a bright, sunny spot and adequate humidity to thrive.
Why Grow Rosemary in Water?
Growing rosemary (and other herbs) in water offers several advantages:
- Simplicity: Water propagation is straightforward and requires minimal tools.
- Visual Appeal: Watching roots develop in water can be a fascinating process.
- Space-Saving: Perfect for small apartments or indoor spaces.
- Ease of Maintenance: Regularly changing the water keeps the cuttings healthy and free from pathogens.
Step-by-Step Guide to Propagating Rosemary in Water
Step 1: Select Your Cutting
Choosing the right cutting is vital for successful propagation. Here’s how to do it:
- Timing: The best time to take cuttings from a rosemary plant is in spring or early summer when the plant is actively growing.
- Tools: Use a clean, sharp pair of scissors or pruning shears to avoid damaging the plant.
- Choosing the Stem: Look for a healthy stem that is about 4-6 inches long and has several sets of leaves. Avoid stems that are flowering, as they may not root as effectively.
Step 2: Prepare the Cutting
Preparatory steps will help ensure your cutting thrives:
- Trim the Leaves: Remove the lower leaves from the stem, leaving a few at the top. This helps reduce water loss and focuses the plant’s energy on root development.
- Optional – Dip in Rooting Hormone: While not necessary, dipping the cut end in rooting hormone can stimulate root growth.
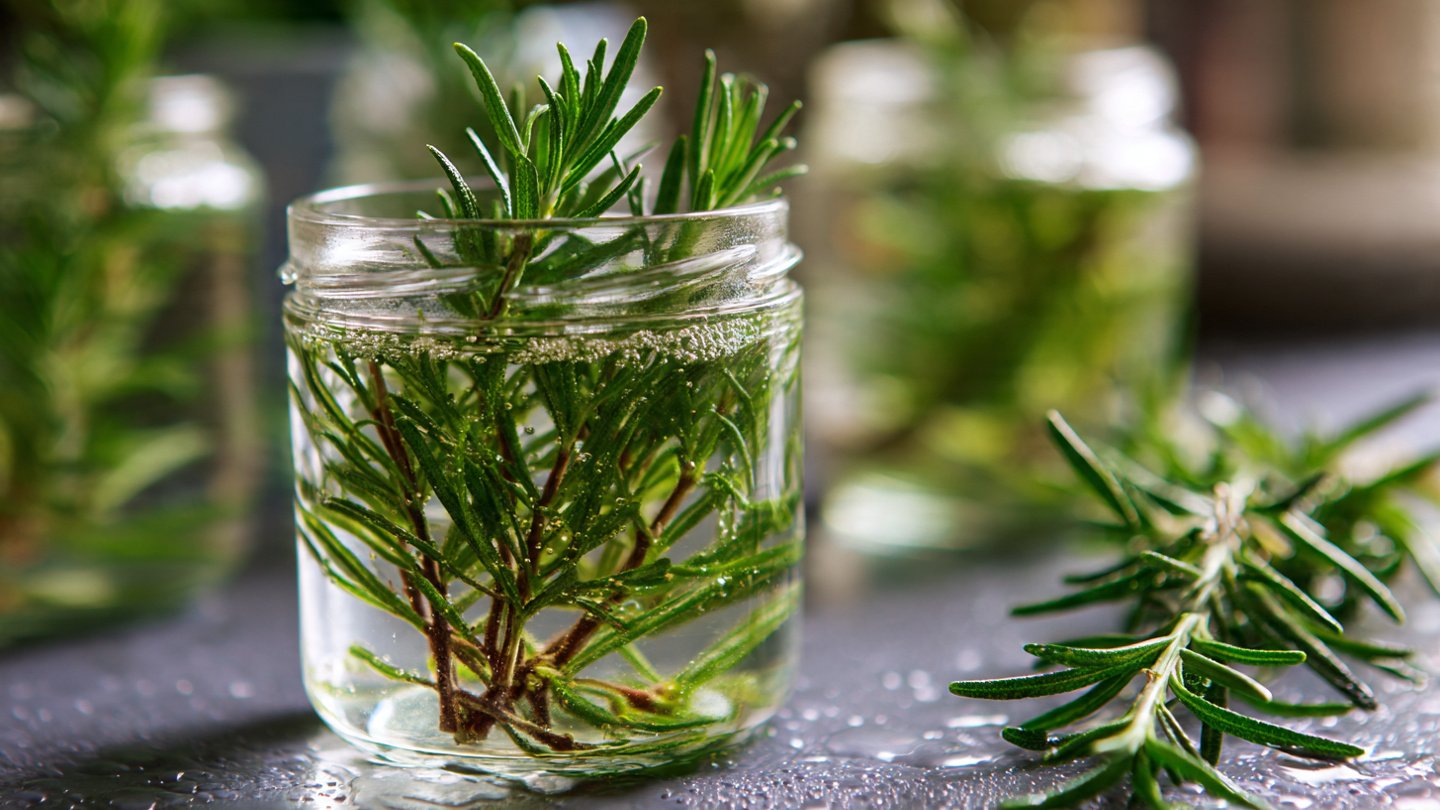
Step 3: Place the Cutting in Water
Now it’s time to set your cutting up for success:
- Choosing a Container: Select a transparent glass or jar to allow you to see the water level and root development.
- Water Quality: Use room temperature, filtered, or distilled water. Tap water may contain chemicals that hinder root growth.
- Insert the Cutting: Place the cutting in the water, ensuring that the leaf nodes (where you removed leaves) are submerged while the top is above the water.
Step 4: Provide Ideal Growing Conditions
To encourage healthy growth, create an environment where your rosemary can thrive:
- Lighting: Rosemary requires 6-8 hours of direct sunlight daily. Place your container near a south-facing window. If natural light is insufficient, consider supplementing with grow lights.
- Temperature: Aim for a consistent temperature of around 65-70°F (18-21°C). Provide warm conditions but avoid placing the cutting near heat sources like radiators.
- Humidity: Rosemary prefers slightly humid conditions. To increase humidity, group your cuttings together or place a humidity dome (a clear plastic bag) over them. Just make sure to allow for some airflow to prevent mold.
Step 5: Change the Water Regularly
Maintaining clean water is essential:
- Frequency: Change the water every 5-7 days to prevent stagnation and bacterial growth.
- Clean the Container: Rinse the container when changing water to remove any contaminants.
Step 6: Monitor for Root Development
With a little patience, you’ll soon see roots developing:
- Rooting Time: It typically takes 2-4 weeks for rosemary cuttings to develop visible roots. Look for roots that are 2-3 inches long, as these will be strong enough for transplanting.
- Signs of Health: If your cutting remains green and healthy while rooting, that’s a great sign!
Step 7: Transplanting Your Rosemary
Once your cuttings have established a robust root system, it’s time to transfer them for long-term growth:
- Prepare Planting Soil: Use a well-draining potting mix. A blend made for herbs or a combination of potting soil and perlite works well.
- Choose the Right Container: Opt for pots that have drainage holes to prevent waterlogging.
- Transplant Carefully: Gently remove the cutting from the water, being cautious with the roots. Place it in the potting mix, covering the roots and leaving the top of the cutting exposed.
- Water It: After transplanting, give it a good drink of water and place it in a bright location.
Caring for Your Indoor Rosemary
Once transplanted, maintaining your indoor rosemary will ensure a thriving herb garden:
- Watering: Allow the top inch of soil to dry out between waterings. Overwatering can lead to root rot.
- Fertilizing: Feed your rosemary with a balanced liquid fertilizer every 4-6 weeks during the growing season, diluted to half strength.
- Pruning: Regularly trim the plant to encourage bushy growth. Remove any flowers that form to promote leaf production.
- Pest Control: Keep an eye out for common indoor pests like spider mites and aphids. Neem oil spray can help manage infestations.
Frequently Asked Questions (FAQs)
Q: How long does it take for rosemary cuttings to root?
A: Rosemary cuttings typically take 2-4 weeks to develop roots, depending on environmental conditions.
Q: Can I propagate rosemary in soil instead of water?
A: Yes, you can propagate rosemary directly in a well-draining potting mix. Ensure consistent moisture and humidity for optimal growth.
Q: Do I need to fertilize rosemary while it is rooting?
A: It is not necessary to fertilize cuttings while they are rooting in water. Wait until they are transferred to soil before fertilizing.
Q: How do I ensure my rosemary stays healthy indoors?
A: Provide adequate light (6-8 hours of direct sunlight), maintain humidity, and avoid overwatering. Regular pruning promotes bushier growth.
Q: What should I do if the roots are not developing?
A: Ensure your cutting is receiving enough light, change the water regularly, and double-check the health of the cutting for any signs of mold or disease.
Q: Can I grow other herbs using the same method?
A: Absolutely! Many herbs like basil, mint, and sage can also be propagated in water from cuttings.
Conclusion
Growing rosemary in water from cuttings is a simple and effective way to cultivate this aromatic herb indoors. By providing the right conditions and care, you can enjoy the process of watching your cuttings develop roots and eventually grow into healthy plants. Whether you use it for cooking, as a fragrant addition to your home, or as part of a thriving indoor herb garden, rosemary offers endless possibilities. With patience and care, you can create a green oasis right in your kitchen or living room, bringing both beauty and functionality to your space. Happy gardening!