
Roses are the ultimate symbol of love, beauty, and elegance. But growing them can sometimes feel intimidating — the right soil, sunlight, fertilizers, and care often seem overwhelming for beginners. What if I told you that you could make roses grow roots and bloom prolifically with just one cup of water? Yes, it’s possible, and it’s simpler than most people think. This technique is not only easy but also exciting, effective, and perfect for anyone who wants to enjoy stunning roses at home.
In this article, we’ll dive into the secret method that allows roses to sprout roots quickly and bloom abundantly, step by step, along with tips for ongoing care and maintenance.
Why This Water-Only Method Works

Roses naturally absorb moisture and nutrients from their environment. While traditional planting relies on soil, this water-only method creates optimal conditions for root growth:
- Constant Moisture – Roots need water to grow. Keeping the cutting immersed ensures consistent hydration.
- Oxygen Availability – A clear glass or transparent container allows oxygen to reach the cutting, which encourages faster root development.
- Minimal Stress – No heavy soil or transplant shock — the cutting can focus all energy on growing roots.
This approach is particularly effective for softwood and semi-hardwood rose cuttings, which respond well to water propagation.
Materials You’ll Need
You don’t need fancy equipment or expensive fertilizers to try this method. Here’s everything you’ll need:
- Rose cutting – Choose a healthy stem from a rose bush. Ideally, 4–6 inches long with a few leaves.
- 1 cup of water – Clean, preferably filtered water.
- Small container or glass – Transparent containers work best to monitor root growth.
- Optional rooting hormone – Can speed up root formation, though not necessary.
- Sunlight – Indirect bright sunlight is ideal for growth.
Step-by-Step Guide to Growing Roses in Water
1. Select the Perfect Cutting
- Choose a healthy, disease-free stem from a rose bush.
- The cutting should be 4–6 inches long, with at least 2–3 leaves intact.
- Cut just below a leaf node — this is where roots are most likely to develop.
2. Prepare the Cutting
- Remove the lower leaves to prevent rotting in water.
- Leave 2–3 leaves at the top to help the plant produce energy through photosynthesis.
- If you want, dip the cut end in rooting hormone — this isn’t mandatory but can encourage faster root growth.
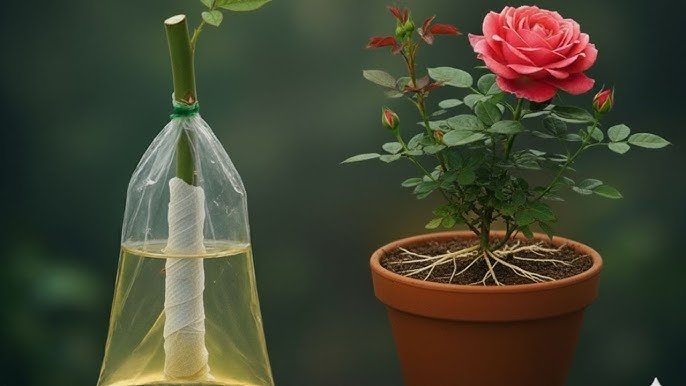
3. Place the Cutting in Water
- Fill a small container with just 1 cup of water.
- Insert the rose cutting so that the lower 2 inches of the stem are submerged.
- Keep the leaves above the water to prevent rot.
4. Position for Sunlight
- Place the container in bright, indirect sunlight.
- Avoid direct afternoon sun, which can overheat the water and damage the cutting.
5. Change Water Regularly
- Replace the water every 2–3 days to keep it fresh and oxygen-rich.
- Clean the container before refilling to prevent algae or bacteria buildup.
How to Know Roots Are Growing
Within 7–14 days, you’ll start to see tiny white or light-colored roots emerging from the submerged nodes. These roots will continue to grow, and in 3–4 weeks, you may have a fully developed root system ready for planting in soil.
Signs of healthy growth include:
- Firm, white roots
- Leaves remaining green and vibrant
- Stem standing upright and healthy
Transferring to Soil for Maximum Blooms
Once the rose cutting has developed roots, it’s time to plant it in soil for blooming:
- Prepare Soil
- Use a mixture of garden soil, compost, and sand for excellent drainage.
- Fill a pot or garden spot with this soil mixture.
- Planting
- Gently place the rooted cutting into the soil.
- Cover the roots and firm the soil lightly around the stem.
- Watering
- Water lightly to settle the soil.
- Maintain consistent moisture, but avoid waterlogging.
- Sunlight
- Place in full sun for at least 6 hours a day.
- Bougainvillea, hibiscus, or other companion plants can provide partial shade if needed.
With proper care, your rose cutting will not only survive but produce multiple blooms quickly.
Tips for Encouraging Abundant Blooming
To maximize flower production and enjoy roses that bloom “like crazy,” follow these tips:
- Pruning – Regularly trim dead or yellow leaves and old flowers to encourage new growth.
- Fertilization – Use a balanced rose fertilizer or organic compost every 2–3 weeks.
- Sunlight – Ensure at least 6–8 hours of direct sunlight daily.
- Pest Control – Watch for aphids and fungal infections; neem oil or mild soap sprays are effective.
- Temperature – Roses thrive in temperatures between 18–28°C (65–82°F). Protect from frost or extreme heat.
Advantages of This Water Propagation Method
- Quick Root Development – Compared to soil propagation, roots appear faster.
- Low Maintenance – No complex soil preparation or fertilizers are needed initially.
- Minimal Space Requirement – A small glass on a windowsill is enough to start.
- Perfect for Beginners – Even first-time gardeners can successfully propagate roses.
- Satisfying and Fun – Watching roots grow in clear water is visually rewarding and exciting.
Common Mistakes to Avoid
- Overfilling the container – Too much water can submerge leaves, causing rot.
- Using dirty water – Stagnant or dirty water can introduce bacteria.
- Neglecting sunlight – Insufficient light slows root and leaf development.
- Overhandling – Constantly moving or touching the cutting can stress it.
Following the method carefully ensures high success rates and healthy, vibrant blooms.
Creative Ways to Display Water-Grown Roses

Even before planting in soil, your rose cuttings can be part of your home décor:
- Glass Vases – Display multiple cuttings in clear water to watch roots grow.
- Windowsills – Sunlight enhances growth and adds a decorative touch.
- Mini Rose Garden – Combine different rose varieties in small containers for a cheerful display.
Once they bloom, these roses can become a centerpiece for your garden, balcony, or living room, spreading natural beauty and fragrance.
Conclusion
With just 1 cup of water, you can propagate roses, watch them develop roots, and eventually enjoy lush blooms that will amaze everyone. This method is simple, fun, and incredibly rewarding. Whether you’re a beginner gardener or an experienced plant enthusiast, this water propagation technique is a game-changer for growing roses at home.
Start with a healthy cutting today, follow these steps, and soon you’ll have roses rooted, thriving, and blooming like crazy, bringing beauty, color, and joy into your home.